This guide describes detailed steps for configuring SAML 2.0 federated single sign-on using predefined connector between IBM Cloud Identity and Salesforce.
For this federation configuration,
-
IBM Cloud Identity acts as Identity Provider (IDP).
-
Salesforce acts as Service Provider (SP).
Following are the high level steps for configuring SSO between IBM Cloud Identity and Salesforce:
-
Configure IBM Cloud Identity as Identity Provider
-
Create a salesforce connector using IBM Cloud Identity dashboard.
-
Testing SSO
-
Create user in IBM Cloud Identity with same name as Salesforce username if it does not exist.
-
Test IDP and SP initiated SSO.
Configuration of IBM Cloud Identity as Identity Provider
Following are steps to create salesforce connector using IBM Cloud Identity Connect dashboard:
-
Log in to your IBM Cloud Identity Connect tenant with admin user.
-
To start the configuration, navigate to Admin Dashboard.
-
Go to the Applications tab and click Add

-
Search for the Salesforce application and click OK.

-
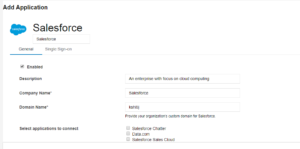
Provide name of the Connector. For example: Salesforce
-
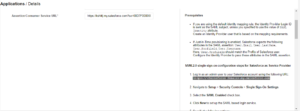
Provide following details in the General tab:
-
Domain Name: Provide your organization custom domain for salesforce.
-
For Example:
-
If login URL for your salesforce organization is https://<mydomain>.my.salesforce.com, enter “mydomain”.
-
Select applications to connect: Select the salesforce applications which is to be displayed on the Launchpad.
-
If none of the applications are selected, salesforce base application is displayed on Launchpad.
-
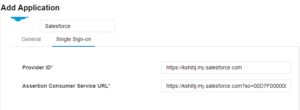
Go to the Single Sign-on tab and provide following details:
-
Provider ID: Value for this field will be auto-populated.
-
Assertion Consumer Service URL: Provide the Assertion Consumer Service URL for Salesforce.
It should be in the following format:
https://<Salesforce Domain>.my.salesforce.com?so=<Salesforce Organization ID>
-
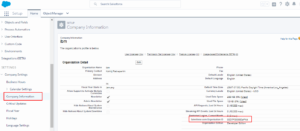
To get the value of ‘Salesforce Organization ID”, log in to your salesforce account using admin user and navigate to Company Settings > Company Information. Note down the organization ID listed in “Salesforce.com Organization ID” field.
-
On the right side, you can see the instructions to perform configuration at Salesforce. Click Save to save your changes.
-
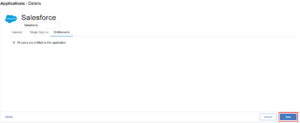
In the Entitlements tab, select users to whom you want to provide access to Salesforce. Click Save to save your changes.
Configuration of Salesforce as Service Provider
-
-
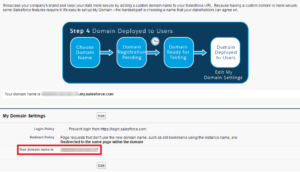
Navigate to SETTINGS > Company Settings > My Domain
-
Create a new domain.
-
Deploy domain to all users.
Now you can use your domain URL to login to your salesforce account.
e.g. https://<domain-name>.my.salesforce.com
Configure SAML SSO for Salesforce
-
Log into the Salesforce organization that acts as the service provider.
-
Select
-
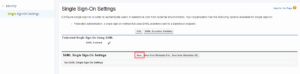
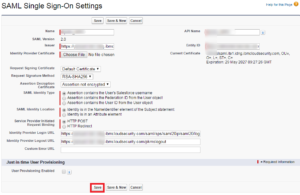
Navigate to Identity > Single Sign-On Settings.
-
Select SAML Enabled
-
Click New to setup SAML based login service.
-
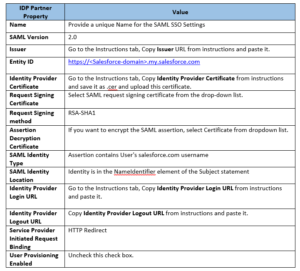
Provide the Identity Provider details as following:
-
After saving SSO settings note down Salesforce Login URL in the Endpoints section. This is the Salesforce Assertion Consumer URL

-
Download salesforce metadata by selecting Download Metadata. This metadata generally is a way to verify Salesforce’s SAML properties like provider ID, ACS URL, etc.

-
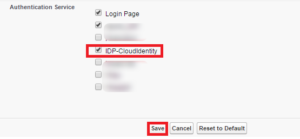
For login page settings, navigate to Setup > Domain Management > My Domain > Authentication Configuration.
-
Click Edit.
-
For the Authentication Service field, select the check box that corresponds to the SAML SSO settings name specified earlier
-
Click Save to save your changes.
SSO Testing
Prerequisites
Cloud Identity user matching with Salesforce username needs to be present in IBM Cloud Identity. If not, create it using dashboard as follows:
-
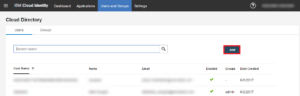
Login to dashboard with admin credentials.
-
Navigate to Users and Groups.
-
Click Add
-
Enter the details of user and click Save.
IDP initiated SSO:
-
Log in to the IBM Cloud Identity Launchpad with end user’s credentials.
-
User should see the Salesforce
-
Click on the Salesforce
User will be logged into the salesforce account. Enjoy !!
